Using Lightroom 4 to Recover Almost Unusable Photos
Adobe Lightroom 4 has some significant changes within its develop module that gives us photographers several new impressive tools when post-processing images. Adobe came out with a new image process version (2012) which is basically the image processing engine behind Lightroom and Photoshop’s Adobe Camera Raw plug-in. This new process version provides many significant updates, including more options when making local adjustments and the new highlights and shadows sliders (which essentially replaces the recovery slider in Lightroom 3). Because of these new powerful features in Lightroom 4 we can now, with much greater ease, recover those photos which we may have thought were unusable.

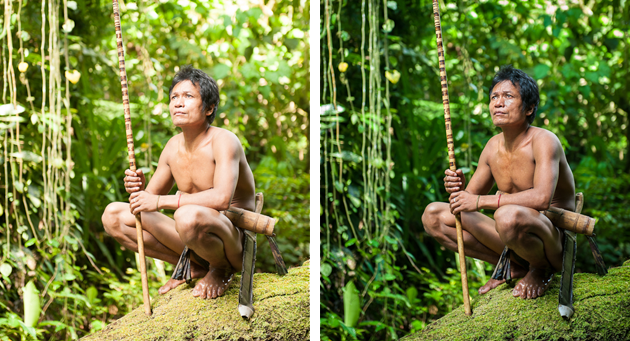
The photo above was shot in RAW, but with all the wrong settings on the camera. It was over-exposed, the white balance was awful, and the original image is lacking contrast. This was a test shot taken while adjusting my camera settings, but it serves as a great way to show how easy Lightroom can bring back the original color and exposure of an image.

Above you will see all the general adjustments I made for this photo within Lightroom’s Develop Module. The first thing you will want to do is make sure you are using the 2012 process (this is the default for new photos within Lightroom 4, but you will have to select this option if you were using an earlier version of Lightroom to process your photos).
After selecting the 2012 process, I was able to bring down the exposure and use Lightroom’s new Highlight slider to recover some of the stronger highlights. You will notice though that if you completely blow out your highlights in a photo it will be difficult to recover. Look at Tumihay’s left cheek just under his eye. This part was a blown highlight and was not recoverable.
I then adjusted some selective luminance and the overall white balance to get a more natural color. With these few adjustments I was able to get the image to something that would be acceptable to look at. I went on to do a few local adjustments to this image as well, just to darken certain areas of the background a little further (I did not show the local adjustments above). However, 95% of this image was corrected with the general sliders of Lightroom’s new Develop module (with emphasis given to recovering highlights).

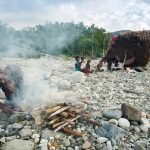
This next photo was also shot in RAW, but it was slightly underexposed to prevent the sky from being blown-out. Lightroom’s Shadow slider tool allowed me to bring back a lot of the detail that wasn’t visible in the original RAW file. I also brought down the highlights slightly to bring some additional detail back into the sky. This new Shadow slider tool allows you to bring back a lot of detail in the dark portions of your images without compromising much quality. Again, the Shadow and Highlight slider tools are only available in Lightroom 4 when editing using the 2012 process.