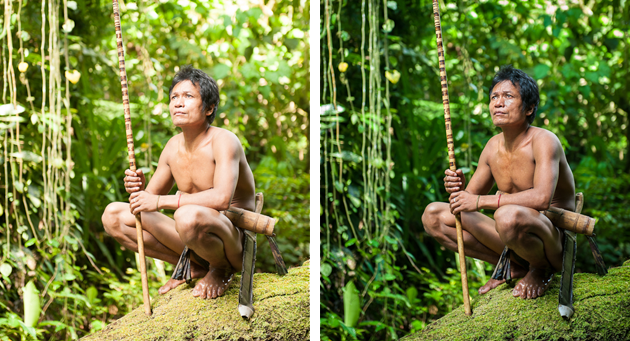
There are five common elements that great images typically have; Good use of light, color, a captivating moment, correct composition for the given situation, and the photographers choice of distance to their subject. Many times good images will use one or two of these elements, but lack strength in the others. I will be the first to admit that it is difficult to have all of these elements come together in one frame. Rarely do I take what would be considered a great photograph, but by aiming to capture all of these elements makes me strive to be better.
Adobe Lightroom 4 has some significant changes within its develop module that gives us photographers several new impressive tools when post-processing images. Adobe came out with a new image process version (2012) which is basically the image processing engine behind Lightroom and Photoshop’s Adobe Camera Raw plug-in. This new process version provides many significant updates, including more options when making local adjustments and the new highlights and shadows sliders (which essentially replaces the recovery slider in Lightroom 3). Because of these new powerful features in Lightroom 4 we can now, with much greater ease, recover those photos which we may have thought were unusable.
I often find myself analyzing other photographers images which inspire me. This helps me to think creatively and technically when I’m not out shooting myself. When looking at other photographers photos I ask myself questions such as; Where is the light coming from? How did the photographer interact with the subject? What is it about the composition that makes this a strong image? These kinds of questions are typically answered casually when I’m browsing photos, but it’s important to slow down occasionally and look a little closer. Here are two travel photos with more specific information on the conditions of how each was captured. I hope these examples will sprout some questions and get your creative and technical juices flowing.
Whether you are taking landscapes, portraits, or travel shots one of the bigger questions photographers are often faced with when shooting outdoors is what do we do with the sky? Because the sky is dynamic, it’s constantly changing its look, from its color to its brightness to the types of clouds it has in it, creating numerous photographic opportunities and challenges. By being aware of how the sky can influence and change our photos we will begin to make the most out of the different situations we find ourselves in. Here are a few suggestions that might help you think about the sky when shooting outdoors.
With the market today providing an assortment of underwater casing options, more and more of us are beginning to bring our cameras under the surface to explore this fascinating world. From the more affordable soft casings for our DSLRs to the simple waterproof coverings for our smart phones, underwater photography is becoming more and more popular among photographers. Often times for those just starting out with underwater photography, our pictures don’t always come out exactly the way we remember seeing it. There are likely a few reasons for this, but this article will focus on two simple techniques we can use during post-processing to help improve the quality of our underwater photos.
Crowdfunding is a relatively new phenomenon that has emerged over the past few years to help creative people fund their personal projects, including photographers. Kickstarter was the first company to offer this type of platform and others such as emphas.is and IndieGoGo have emerged since. Crowdfunding is a unique way to raise funds for projects by offering creative rewards to individual backers who pledge various amounts. Recently, we successfully funded our project on Kickstarter and wanted to share some lessons we learned along the way.
When most of us hear the phrase “photo editing” we generally think of editing a photo to enhance it in some way using computer software. Although that is usually a big component of post-production, the “photo editing” process should always start with photo selection. When photo editors edit photos, what they are usually doing is selecting images that they feel will work for a particular use. Most of us end up being our own photo editors, so we should be familiar and learn how to select our best images. The photo editing selection process should be one of the most important parts of your post-production, but is often not given enough emphasis.
We all have a photographic style whether we realize it or not, amateurs and professionals alike. Many photographers, however, never give much thought to this with the result often being images that are “normal” or lacking expression. If we want to improve our photography we need to: First, understand we each have a unique style. Second, reflect on this to better understand why we shoot the way we do, and lastly, use this knowledge to move forward with self-confidence to help improve our skills and imagery.
There are numerous things to think about and often challenges to overcome when working on a photo documentary. Here are eight useful tips that I believe will make the process easier and help you create more compelling and powerful stories.
Robert Capa once said, “If your pictures aren’t good enough, you’re not close enough.” Capa wasn’t advocating the use of longer lenses; he was telling photographers to physically get closer and more involved with their subjects. If you ever look at the lenses photojournalists have on their cameras, you will almost exclusively see some type of wide-angle. This is because photojournalists generally want their viewers to feel like they are there in the scene with them. A wide-angle lens allows the photographer, like the photojournalist, to work very near their subjects, providing an intimate feeling in their photographs.
email: [email protected] |
© 2026 Jacob Maentz