The Crucial Skill in How to Select your Best Images
When most of us hear the phrase “photo editing” we generally think of editing a photo to enhance it in some way using computer software. Although that is usually a big component of post-production, the “photo editing” process should always start with photo selection. When photo editors edit photos, what they are usually doing is selecting images that they feel will work for a particular use. Most of us end up being our own photo editors, so we should be familiar and learn how to select our best images. The photo editing selection process should be one of the most important parts of your post-production, but is often not given enough emphasis.
So how do I select my best images? Well I think it takes practice and some knowledge of what an audience will respond to. Of course certain images will do better depending on their medium and audience which is why photo editors have the job they do – they make this call. There are however other general qualities we can find in “better” images without considering the audience.
Below are some examples that explain why a particular photo was selected over others. I think this is a good exercise to do so we can start to be more critical of our images. Details in a photograph matter and can change the entire meaning of an image. When we start spending time learning how to select images we become more aware of the small details that are so important. We also start to get familiar with stronger compositions and the use of light. Likewise, we start shooting better and begin to share only our strongest images.

This is a good series to show how small subtleties can make for a stronger image. The first thing I noticed when looking at these images was that I liked the ones with the girl holding her shirt the best. It seems that in these images she is more relaxed and I like her stance much better. I was also able to zoom in during these particular gestures which I think helps isolate the girl a little more (I think isolating the girl in this particular image works because we already know she is in a rice field). I decided on the right image in the middle row. The girl seems most relaxed in this particular image and you can see more of her face. Additionally, although a small detail, the rice stalks in the chosen image look better to my eye. If you look closely at the other images you will notice one rice stalk shooting off into the left of the picture. To me this “out of place” rice stalk adds a small distraction that takes away from the girl.

In the above series, I selected the bottom left image. The women looking up at a customer gave this image an extra component the others were lacking. I feel being able to see her eyes helps the viewer connect better with the photo, in addition to providing a deeper storytelling element (showing her engaging with a customer).

Here are two photos that are similar yet very different. These photos were taken within 5 minutes of each other but tell completely different stories. They could both potentially be used depending on the purpose, however, I find the second photo to be more engaging. There is more emotion shown in the second image because the man is carrying the vegetables and his helpers are on the side. It makes me want to know more about the situation and what they are doing. Because of the storytelling component of the second image I believe it is the stronger one.

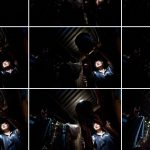
In this series, I was looking for a natural expression of the shrimp fisherman. I didn’t want a photo of him looking straight at the camera, but I wanted to be able to see his face. I felt the best way to do this was to ask him if he could look in the other direction away from what he was doing. I knew I may get some awkward shots of him looking away, but I was only after one frame that captured a heartfelt expression. To me there is only one that captured this expression, the left image on the third row.
Tools for helping you select images: There are many software programs that can help you organize and make the selection process easier. Here are a few of the more common ones I find useful.
Photo Mechanic – Photo Mechanic is a great tool to view your images with speed before importing them into Lightroom or Aperture. It allows you to quickly compare multiple images and select the best ones from a sequence. The speed at which you can view and select your high resolution images is one of the best attributes of this software.
Adobe Lightroom – Lightroom is a great all-around program for organizing, selecting, developing and exporting your photos. You can use the Library module to select your best images using tools called Compare View or Survey View. Although these can be useful for selecting your best images, I often just use the Thumbnail View and select from there. Lightroom can sometimes be slow when dealing with a large amount of pictures and therefore I recommend using Photo Mechanic or Bridge for your initial selection process.
Adobe Bridge – Bridge is a another great way to view images, especially if you plan to edit your photos directly in Photoshop or prefer to use Camera Raw for your raw conversions. I also find Bridge to be much faster than Lightroom providing a better way to view images when all I need to do is make selections or look at metadata.